Friday, April 25, 2014

A Bridge Even More Too Far : A World War Risus Session Report

I was itching to play some World War Risus, both for my own amusement, but also to post an example of play.

So, I used Platoon Forward (hereafter referred to as PF) to generate a scenario. My force, the US, would attack, with the objective was to occupy and hold a bridge. 

I placed that more or less central on the table, randomly generated the terrain using the method outlined in PF and then diced to see which side of the table was mine.

The scenario description recommended using my entire platoon. The remaining support was diced for per the scenario's description.
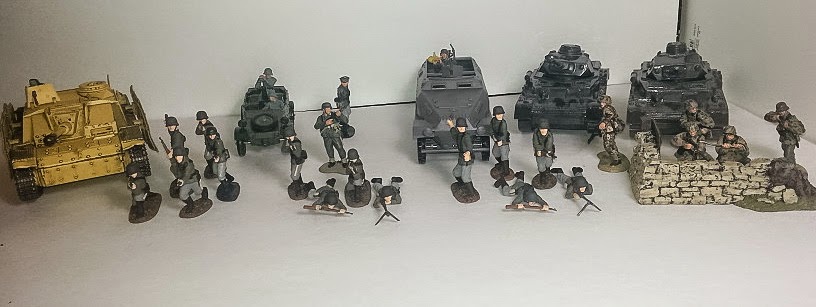
The Final OOB:
1 Platoon HQ
3 x Rifle Sections
1 x Heavy Weapon team
1 x Sherman

The enemy ended up with 4 Type A blinds and 3 Type C blinds. Blinds can be nothing or something. A is usually infantry, C is armor and such.

I also used the PF guidelines for determining leadership ability and translated those into World War Risus cliche dice.

I decided that the German platoon commander would have a Leadership to match mine, so 4 dice, with the stipulation that any successes the German Commander rolled could be used by any German unit on the board, regardless of LOS (since to start with, the commander wouldn't even be on the table).

The set up:


The brown in the foreground are fields and an orchard. I wasn't keen on using the rubble, but I rolled up 2 buildings for that section, so I had to make do.

I diced for my troop locations (not part of the scenario but a preference I have):


Turn 1
US - 2 Successes to Germans - 1 success.

I decided to distribute both successes, 1 to 1st section (my right) and 1 to 2nd section (my center).  


1st section rolled 1 Leadership success, which gives them 2 total.

With orders to advance to identify possible enemy movement in the woods opposite, they made their way into rifle range.


Here I decided that to spot a blind, they had to roll their CE, and with 1+ success they would succeed. In retrospect, I think I'd prefer to use the Risus target numbers.

In any case, they failed.

2nd Section also rolled one success 1 success (with only 2 cliche dice for Leadership, that was pretty good) + 1from HQ, so they moved up to the bridge. [I SHOULD have had them try to spot the blind, but for some reason didn't]

Meanwhile, the 3rd section, out of sight of HQ, had orders to advance to the edge of the orchard and try to ID any enemy by the house opposite. 

They rolled 1 success and advanced towards edge of field, but didn't quite reach it and were thus still concealed themselves.

The Sherman rolled 2 successes (the crew had a Leadership of 2 cliche dice, so that was awesome), and advanced parallel to 3rd section. The extra point was wasted.

The bazooka team scored 1 success and moved towards the road, using the ruins as cover.

The Type A blind in the woods had a clear shot at S1, and so I decided it would reveal itself. 

I rolled on the table in PF, and it turned out to be an infantry squad. 


I rolled for their Leadership and got 2. They rolled and scored 1 success and opened fire on 1st section with three successes!

1st section rolled and scored 1 success. With 2 less than the Germans, they lost 2 dice from their Combat Effectiveness cliche, and automatically lost 1 from their Morale cliche, before taking the Morale check. They scored one success on the Morale test which meant they were forced back and pinned.


I decided the Type A blind behind the wall would reveal itself as well (if it was anything), to get a shot at my section approaching the bridge:


It too was an infantry squad, although with 3 Leadership cliche dice.

Their Leadership roll scored 2 successes, so they opened fire; 2 successes.

My 2nd section rolled ZERO in response and thus lost 2 CE cliche dice and 1 Morale cliche die. The morale check could have gone worse, I suppose, as they fell back pinned, like 1st section.

At this point, I didn't think any of the other blinds needed to be revealed, since if anything, it might help my cause to know what remained.

At the end of turn 1, I had two sections reduced to Combat Effectiveness of 1 die, with Morale down to 2 dice each. 


This isn't a good way to start.

Turn 2 and 3
My troops made no progress and in fact, lost a bit.

1st section unpinned and began to move for cover behind the farmhouse, but didn't quite make it. 2nd section could not unpin and kept their heads down while the squad leader shouted for them to get up and make a run for cover.


The bright star in an otherwise dark void, 3rd section advanced to the orchard's edge to fire on the German's behind the low stone wall. Unfortunately their shooting was ineffective, while the same could not be said for the German squad, who, on their half of the turn, returned fire, and forced 3rd section to fall back pinned, and lose 1 die from their Morale cliche.

My bazooka team dove for cover behind the ruins, and the Sherman got stuck in a rut in the fields, as it did not change position.

At the end of each of these turns, using the table in PF, similar to Mythic GME, I asked, "Will the Germans reveal any blinds?" and set the possibility to Very Unlikely. I rolled a 4, which meant, no.

Phew!


Turn 4


I decided I would try to gain contact with 3rd section and the tank (I kind of abandoned hope for 2nd section and I was just trying to preserve the 1st section) and began to move in that direction.

1st section managed to get behind the farm house, finally, but the other two sections were hugging the dirt.

At least the Sherman's crew finally took some initiative and advanced to the edge of the field. With only 1 success scored, that was all they could do.


The squad on the German left scored two successes. So I asked the all knowing table if they would move. I though that was very unlikely, but the dice felt otherwise. 

I asked if they would fall back and got a no, so they advanced towards the bridge (about half-way), which put them in firing range of my 2nd section in the center.

They did no damage, but forced a morale check, which the 2nd section failed, leaving them double pinned at the table's edge.

The squad behind the wall opened fire on the tank (this was more to test that rule a bit, than for a good decision) in hopes of driving it back but failed.


Turn 5
I'll be honest, things were looking bleak.

Section 1 did nothing. Section 2 failed to unpin. Section 3 at least unpinned but had nothing left for any other actions.

The Sherman finally got off a shot at the Germans behind the wall, but, despite rolling 7 dice, scored only 1 success. The Germans handily avoided any damage and even passed their morale test (with 3 successes!).

The squad on the German left finished moving to the bridge.

New German forces arrived in the center (they should have arrived last turn): a squad and a Panzer IV.


At least the new German squad had a Leadership cliche of only 2 and did nothing. The Pz.IV took advantage of the road and advanced to the bridge to support the German squad already there.


Meanwhile, the German squad behind the wall figured it wasn't safe there anymore and abandoned their position, intent on putting the house between it and the Sherman.

Turn 6
Section 1 and Section 2 again did nothing, the bazooka team advanced into the ruins, albeit too late, to try to get close for a shot at the Panzer.

Fortunately, the Sherman opened fire on the Panzer and scored 4 successes to zero! Using the rule the one-shot kill rule for vehicles, I re-rolled those 4 dice and scored a 13 (>=10 was the target) and the Pz.IV was destroyed!


Still, there would be no joy in Mudville.

The Germans by the bridge scored 2 successes.

First, they opened fire yet again on the 2nd section, who had been busy dining on delicious French soil. With only 1 die left in Combat Effectiveness, they were done for the day.

Then, using the 1 success from initiative, plus their remaining 1, the Germans fired a second time (each successive action of the same type in the same turn costs 1 additional success), they opened fire on the 3rd section hanging out near the edge of the orchard.

Outscoring them 2 to 0, Section 3 was destroyed.


The other other German sections moved. I decided for the heck of it to reveal the remaining blind, which mercifully, was nothing.

Down two sections, with the third badly wounded, and the German troops at full strength, save for the Panzer, I ordered my forces to fall back. 

1 German squad is behind the house.

Mission Failed!

Monday, April 21, 2014

1/32 German Force: Phase 1 Complete

On Sunday, as I hoped, I finished the two figures I needed to bring my Germans up to the "phase 1" numbers.


Here is the complete German arsenal available at present, including a Squad / Platoon of Waffen SS.

The Forces of Valor / Unimax / 21st Century (one of those) StuG is 1/32, while the Pz. IVs and Sdkfz are 1/38 ish (all CTS vehicles are undersized). According to W. Britain / Deetail, the kubelwagen is 1/32.

The figures are Airfix, Matchbox, and W. Britain.

Beneath Trelleborg :Session 3

Friday night, I ran the 3rd session of my mini-mega dungeon for 5 players (and a 6th joined us later, after observing us playing for 10 minutes or so.)

You can read the summary over on the campaign blog.

TL; DR summary: 3 PC deaths and a sky high body count of monsters.

Saturday, April 19, 2014

Paint Table Saturday #4

After stumbling on a blog that gave some ideas about painting 1/72 fast, I decided to give it a whirl - it is definitely faster than I've been doing, but at the sacrifice of my beloved black lining. I am already planning to go back and add the line after, as it won't add that much time. Unless i totally botch it!

Here are 6 Swedish infantry from Zvezda for the Great Northern War after an hour of painting - they started out as black primer.


Like I said, definitely faster than I've been doing them. Another hour and they will be done.

And here are some 1/32 Germans I am working on to complete phase 1 of my WWII collection (the flame thrower was something I found in a box of primed items, so I decided to finish him too):


I believe the flamer thrower is Matchbox, while the officer and SMG are both Airfix.

Thursday, April 17, 2014

First Phase of 1/32 WWII Forces 2/3 Done!

Last night I finished up 5 figures I've been working on (1 Soviet and 4 US) to bring 2 of my 3 1/32 armies to "first phase" readiness (3 infantry units of 4 figures + NCO  + 1 CO and 1 tank).

Here is the Soviet commander surveying the troops from a distance:


And here he with his full force (Infantry is Airfix + 2 Supreme figures. Armor is CTS) . In addition to an extra figure per unit, notice the abundance of armor!

The 2 Supreme Russian figures, ATR and mortar, will be re-painted
but are useable as is, despite their ugliness.

And here is the US force - considerably less armor! They too have an ATR and mortar, but also an MMG. Just over half of the US force is W. Britain Big Red 1 figures, the rest are TSSD. The tank is CTS.

The astute among you will notice I have not yet attached the Sherman's turret MG.
I plan to wrap up the 2 German figures I need before the weekend is out and Phase 1 will be complete - allowing me to field these forces for World War Risus, or to play 1:1 section/squad or smaller games.

Phase 2 will either involve getting everyone up to 7 figure units (6 infantry + 1 NCO) or getting all forces to have similar equipment (well, no one will have as many tanks as the Russians, but the Russians need a Maxim, and some kind of transport, the US needs a transport, the Germans need a tripod mounted MG-42). 

And yes, somewhere in there, I'll get around to finishing the Soviet and German bases.

Wednesday, April 16, 2014

Return to Skalafell

Forever ago it seems, I ran the follow up session of Fjörgyn's adventure in Skalafell.

****

When we last left our heroine, she stood towering over the dead monster. 

She wasted no time exploring but instead decided to get Thora back to Skalafell - perhaps to make up for leaving the poor Grungo behind in the last underground escapade. With Zelligant's help, she carried Thora's lifeless body to the Shrine of the Forgetful Bear, where Sister Rebecca could tend to the rites of the dead. When offered healing, Fjörgyn declined and instead went off to the Queen's Cauldron for a little socializing with the locals, intent on finding another hireling.

She moved around the bar from stool to stool ("but there wasn't gum under any of them") and spread the word that she was looking for another to join her gang of merrymakers (not her words). Of course, the scent of death hung thick in the air about her, with two of the locals formerly in her employ quite dead, and so enthusiasm was not as high as it might have been. Still, the weirdest guy in the place, with his face covered mostly by a mask approached, and within a few minutes, had accepted the job.

In addition, Charlie Bucky, a halfling sized cat [a nekomata? We're just using halfling stats but she gets 2 claws and a bite per round. Giving my gf two PCs to increase her chances of survival and to reduce reliance on too many hirelings] in plate mail with sharpened steel sheaths for her claws and a short bow caught up with Fjörgyn and was more than happy to go along with whatever adventure she had planned.


Charlie Bucky
In the morning, Fjörgyn and Charlie Bucky met her staff outside the Cauldron and discussed the plan for the day - to their surprise, she announced she wanted to leave for Gorgoroth (that was way more surprising than the warrior cat creature). Fjörgyn felt quite certain that, having slain the strange beast, the missing girl would be able to escape the perils of the underground lair and return home and if not, she was probably already dead.

Fjörgyn is nothing if not a realist.

[here the session ended as I was not prepared for a hex crawl. i explained the need to equip for the travel and the dangers that might pose, so that she could make informed decisions about what to bring. Since then, after further discussions about the nature of the game, my gf has decided that she wants to explore the dungeon a little more before moving on to the next town of Hael.]


Sunday, April 13, 2014

Paint Table Saturday #3

OK, I've failed miserably on taking pictures of my paint table. On the other hand, I don't paint on Saturdays usually.

On the table right now are 4 US infantry, including an NCO and 2 BAR gunners, and a Soviet commander.


My immediate goal for my 1/32 troops are 3 units of 4 infantry + 1 NCO, and a single overall commander figure, for use with my World War Risus rules. So I'll either have 1 company, composed of 3 platoons of 5 figs each + Company HQ, or 1 platoon composed of 3 sections of 5 figs each + Platoon HQ

What you see here will give me that for the US and Soviets. 

Primed, but not pictured, are a German officer and NCO to complete my Wehrmacht "Company/Platoon." After they are done, I'll move on to support weapons - the US leads the way there with MMG, Bazooka and mortar ready to go, the Germans have a panzerfaust, and the Russians have nothing painted in that respect, unless you count the factory paint job on the Supreme Russians (it's hideous), in which case they have an ATR and mortar.

Monday, April 7, 2014

World War Risus is Available

My Risus-based wargaming rules are available in a more organized form finally.

You can download the PDF and review it to your heart's content.

No exploration of including standard Risus PCs in a battle have been included, but my inclination is that this would not be difficult, at least if you don't mind a Pulp-y feel.

Here are some first thoughts on it:

  • Treat each character as a unit. 
  • They don't take morale checks.
  • They can use any cliche, appropriate or not, for initiative and combat, including using different cliches each turn. 
  • All damage is recovered when the battle ends. 
  • They attack enemy units at the lowest level possible (if you're smallest unit is the platoon, then when the PC attack's, they attack the whole platoon). So yes, Bob the Hairdresser can take out an entire platoon.
  • They can use the team-up rules from Risus.

Saturday, April 5, 2014

Happy International Table Top Day!

My day was made around 11 AM this morning:


You can argue, correctly in my opinion, that it wasn't a game. 

There were no rules, there were no randomizers, there was no doubt as to the outcome. If anything, it was more like a proto-wargame. I like to imagine him as H.G. Wells toying about with that cannon before coming up with Little Wars.

So, yeah, my two-year old son played with "toy soldiers" for the first time. I could not have been more ecstatic!

Friday, April 4, 2014

Spring Cleaning!!!

As the list of items I have acquired has grown, so too has the list of items that have not been touched, or will never actually be used in play or for future reference.

Rather than continue to take up valuable shelf and closet space (space I could use for more stuff!), I'm going through my books and minis and such and having a yard sale. Except a real yard sale would see about 1 visitor where I live, so to make it easier on everyone, my yard sale is virtual.

Here's the link to my yard sale: 


(not to be confused with my bucket of spiders blog)

If you see something you want, message me here or there or Google+ and we'll work it out. There is much more to come (including "old school" boxed sets, a lot more Reaper Bones minis, old Dragon magazines, rulebooks, etc.), I've only just started posting items.

If you think my price on something is too high, and you want it, please, counter offer!

The posts say "US only", and if I don't know you in some context, that's true.

But, if you follow this blog, or comment on this blog, or I follow you on G+, or  I follow your blog,  or you purchased a copy of 6 Iron Spikes & a Small Hammer #1, or I know you in some way, and you're not in the US, that restriction doesn't apply. Just know that shipping can be really pricey.

Tuesday, April 1, 2014

Battle Over Britain: Minden Games - Solitaire Rule Modifications

Sgt. Hill, RAF, kept his eyes open for enemy fighters, the first waves signaling yet another attack. His effort was not wasted; soon, a cloud of Kraut warplanes appeared in the distance.

A few minutes later, chaos exploded around him as planes on both sides were punctured by lead pouring from machine guns,  and smoke and flame filled the once calm sky. 

It was no surprise when he spotted the ME109e coming in 9 o'clock high.

Calmly, Hill pulled up into a steep climb and watched the German fighter dive below him - Hill attempted to roll and dive after it, but the Spitfire wasn't agile enough to maneuver into position for a clean shot at the enemy. 


I know nothing of air to air combat, unless you count watching Top Gun, and it probably shows in the narrative above. However, I've played this game three times now, and each has been quite enjoyable despite this.

Battle over Britain is a small, fast-play (15 minutes or less), wargame from Minden Games - you get the rulebook, counter sheet, hit/damage table and a "dogfight display." The game is for 1-2 players and requires a d6 and a standard deck of 52 cards (and the two jokers to play solitaire).

The rules are fairly straight forward and took more time to read than the first two games I played! In addition to the core rules, there are a handful of optional rules,  a "scenario" generator, a campaign game, solitaire rules including a role-playing option.

In a two player game, each player is dealt a number of cards equal to their Speed rating. Hands are replenished after each round.

One of the keys to the game is having the Advantage (which generally represents altitude. Except when it doesn't). If you have it, you can shoot (maybe), but if not, you can't. The playing cards determine your position on the dogfight display, and the suits determine Advantage.

The plane with Advantage going into a turn plays their card second - clearly this gives them, wait for it, some advantage as they know their opponent's position on the display and can play a card to steal the advantage and get an attack, or at least thwart the enemy and prevent damage to themselves.

Now, as written, in solitaire play, the German plane simply uses the top card from the deck for their card. This works well enough, and I played the first two games this way, but it doesn't reflect any sense that they have an advantage. 

So, I decided to draw two cards, and choose the one that gives the best option. Yes, I could probably draw up to the max number of cards(defined by the speed attribute of the plane) and play the best, but so far, 2 seems to work.

 I rank the cards best to worst as follows:

  • Advantage with possible attack (best)
  • Advantage, no attack
  • Advantage, Head On (both sides fire)
    • Use this if has same or more damage points remaining than British, otherwise No Advantage or Disadvantage without a possible enemy attack is better.
  • No advantage for either side
  • Disadvantage, but no enemy attack possible
  • Disadvantage, enemy attack possible (worst)

The goal, is of course, to give the enemy the best position to win, and to make my life that much more difficult.

I found the decisions for my own cards interesting enough, but by no means taxing. In the last game, due to the cards I had been dealt, the choice was almost always between 5 similarly bad options. I should have used the "yank the stick" option, but forgot all about it (you can discard a number of cards, draw one and you have to play that one regardless). My strategy went from trying to win, to trying to run out the deck and reach a draw.

The solitaire rules also suggest that Germans always take a shot when possible, and that they don't run out of ammo.

All well and good, but I like to roll dice and draw cards and such, so I decided they sure as hell could run out of ammo and would make their decision to fire based on the following:

For a resolution number of:

4+ - always shoot because damage to the enemy is guaranteed.
3 - shoot 75% of the time
2 - shoot 50% of the time
1 - shoot 25% of the time

The Me109 had the advantage often in the third game, but couldn't capitalize on it - either not being able to shoot at all or only having a 25% chance (and then not firing) until turn 8, when he had a resolution of 1 and rolled 16%. 

The tinny sound of bullets perforating metal echoed in Sgt. Hill's ears as his Spitfire was riddled with holes by the German pilot. 

His die roll to hit was a 5, so he scored 2 points of damage against my Spitfire.

The plane still handled well, whatever damage had been done, Sgt. Hill could still fight. Not that he had any choice.

For two more turns the dogfight raged and then:

Feverishly, he worked the stick, trying to get the enemy into his site, but it was for naught. A flash of flame erupted from the engine, and the Spitfire exploded in a horrific fireball; so ended Sgt. Hill's brief career.

The first two games ended in less than 10 minutes, the last took 15 minutes, which is probably on the long end of things. 

The game has a very small footprint, 8.5" x 5.5", and is perfect for getting in some gaming on a lunch break without a big setup/tear down. 

I also have the Solitaire Module, which includes additional planes, and some expansion of the solo system, but I have yet to give them more than a cursory reading.