Showing posts with label 15mm. Show all posts

Thursday, December 18, 2014

It's All Done with Mirrors and Painted Smiles


Last week, I had some time off, and since the nanny was here during the day to take care of the Young Lord, I spent much of those two days painting:


Fearless Men Who Jump and Die!

The Flames of War Open Fire! box is a heck of a value, whether or not you plan to play FoW. Of course, it's only a value if you actually do something with the included bits. I started this platoon of US Airborne last year, put it aside and then, suddenly felt the urge to complete them.


This is my first time ever using static grass. I don't know if I did it right or not, but i love it!

It Was Just My Imagi-nation Running Away from Me

I got a Risk set (the AWI looking bits) a few years ago, thinking I'd use the map for a campaign. But it sat in my closet. Lately, I've been reading about Imagi-nations and getting excited again by the idea. And so, inspired by Kaptain Kobold's Great Northern War project with Risk figures I pondered whether or not I could do something similar. And then it hit me, Riseling vs Sauvignon-Blanc 100 years before the current conflict.

Here are 40 Risk figures painted as the Saintonge Regiment of France, which participated in the AWI.  

There are four bases of line infantry, 2 bases of light infantry. 


I speed painted these to look decent as a group, at wargaming distance. Up close, not so much. (it doesn't help that the figures themselves are terrible. Misshapen heads, missing feet, etc). 


Leader of the PAK

1 1/32 Italeri PAK 40 - nice, easy to build model, it took 3 attempts at priming to get it to stick.

It fits nicely into the 6" grid I use for the 1/32 toys.

Itsy-bitsy Teenie Weeny

Sometime last year I picked up 2 sample packs from GHQ just to see what 6mm looked like in person (yes yes, I can look at a ruler but that didn't tell me what I needed to know).

Here are 3 GHQ 6mm US Army Infantry - painted the same way I paint my 1/32 stuff - this was a test to see 1)if i could paint 6mm, 2)if i would like the results. 


Oh. My. God! This may be my second favorite scale after 54mm (what can i say? I am a man of extremes). They painted up super easily - the details are easy to hit with a brush without painting over previously completed kit. I suspect could knock out a 1:1 company in in a few hours. It's just about all I can do to restrain myself from taking advantage of their holiday 15% off orders over $50.00 deal. 

Bonus:
This may not look like much, but some regular readers might know what's afoot.


On their way to a Slitherin village, two Riesling platoons, led by Feldwebels Feuerbach and Handel, are ambushed by lizard warriors.

Monday, September 30, 2013

Helvetican Messiah: A Space: 1889 Soldier's Companion Session Summary

You can read the setup for the following engagement in this post.

Major Carnap, valued for his expertise in linguistics as for his military mind, was the officer tasked with travelling with Zug 13 (of Carnap's own 7th Kompanie) to find the lizard shaman attempting to foment rebellion in the northern tribes, formerly in allegiance to Sauvignon-Blanc.

They approached the first village from the south, along a "road" (not much more than a wide cart path, here and there "paved" with flat stones) constructed in an attempt to increase trade with the tribes by the Sauvignon-Blanc government, .


The police force entered the village and encountered much apathy, but no hostility nor sign of the shaman.

Choosing to avoid, for now, a point between the dense jungle to his North East and the village just beyond, Carnap led his men down the westward fork of the road. Unfortunately, this was another prime ambush location and in fact, it turned out to be just that.

A fierce battle ensued, but the well trained Riesling force repelled the attackers.

Carnap noted Feldwebel Hankel's fine accounting of himself in bringing down several of the lizard folk handily. Their numbers reduced, the attackers faded back into the dark shadows of the thick and twisted jungle.

The village to the North West proved to be unfruitful as the first. Rather than return by the road to proceed to the North East village, Carnap led his men across the brush and marsh. As they approached the third and final village, and the likely hiding place of the shaman, the platoon formed line.

This was to be of little help as the ambushing force which had earlier fled, had not done so in fear, but in an effort to regain surprise.


Again the battle was hard fought, and this time, Carnap's patrol was forced to fall back in disorder.

 However, his skill as a commander allowed him to rally his troops, advance and reform into a firing line before the lizards knew what hit them, literally. The lizard folk were shot to pieces before the few survivors disappeared again.


To the surprise of all concerned, the third village was not the hiding place of the shaman. Somewhat confounded, the march back to the fort was ordered. 

As the platoon passed the previously avoided jungle, lizard bowman unleashed a concerted attack.


Whether through the rush and excitement of battle or inability, their arrows were of no consequence and soon Carnap's men pushed the ambushers back.

The shaman present, they continued to press on after the tribesmen. Although the platoon suffered some loss (12.5% of the platoon), they routed the lizard shaman and his surviving warriors.


Because they failed to kill or capture the shaman, this counts as but a minor victory for Riesling. It remains to be told whether or not the shaman can rebuild his force and whether or not his message of revolt will spread among the northern tribes.

In the meantime, Colonel Heidegger (promoted after the final battle against Sauvignon-Blanc and the loss of Colonel Dietrech), back in his HQ at Gutenberg (see map), has received word from Major Kant, of 6th Kompanie, now stationed at the fort at Port Guillaume Le Roy, that some ranchers and farmers in the fertile grounds West of the city have been organizing resistance to Riesling's control of the island.

On top of this, the southern tribes, loyal to Riesling, have been clamoring for control of additional land to the north, at the expense of the northern tribes already there.

Heidegger has his hands full.

***
For those wanting mechanics to appear in the narrative, I will post a follow up on what worked and what didn't. - JY

Tuesday, August 27, 2013

Let slip the Flames of War

OK.

Once again, my human failings rise to the fore. I know I said I would not expand my 15mm collection, but, well, I have.

Hear me out  though.

It occurred to me recently that I need to get out more than I do - I've been here 3+ years and know very few people in the area, considering. 

I thought it'd be nice to meet some new folks and play some games while I'm at it. I do this with RPGs to some extent, but there are only infrequent one-shots of interest to me (I can't commit to a campaign). However, there are miniatures games with weekly meetups, just drop in.

So, after surveying the local gaming scene, I came to the conclusion that of the miniature games that are out there and getting frequent play, only one really captures my interest, Flames of War. 

(Malifaux does too, but it's not terribly popular here at the moment, although it was in the past. Perhaps the soon to be released 2nd edition rules will bring players back.)

I know, I know. 

A lot of people seem to have an axe to grind with Battlefront. I don't - although I don't like the recent change to "Battlefront-only minis for official Battlefront tournaments," it's not hard to understand why they would do it.

But you don't have to use Battlefront minis. Unlike, say, 40K or Warmachine, you can get 15mm WWII minis from many sources, and you can still play the game. It's only if you want to play in a Battlefront sponsored event that it matters.

New books don't make old ones obsolete as far as army lists go - at least as I understand it.

Thus, I do not at all see Battlefront in the same light that I see GW. 

So it was that with much research and contemplation, I decided to invest in the Open Fire! starter box, picked up on ebay at a decent price.

The box contains a boat load of stuff - including a pile of 15mm plastic minis and, most importantly, a mini version of the rulebook (I didn't want to sink the money into the big hardcover upfront) and the other kit included in the box looks like I can use it generically. 

Not to mention that the British tanks included can form the basis of a late war Polish tank company, provided I like the game enough to invest additional money into it.

Worst case, I don't like it, and I have 2 15mm forces to use with the other WWII sets I play.

The box is due to arrive on Thursday, just before the start of Dragon Con weekend. I will probably through the rule book in my bag to read during any "down time" I have.

Wednesday, May 8, 2013

There's Foam in That Thar Hill!

Inspired by an article on the rarely-if-ever-updated TerraGenesis, I decided to make a hill out of a scrap of open-cell furniture foam left over from an aborted attempt at building my own figure carrying cases (I now use divided plastic boxes - once i accepted the reality that I don't travel with my figures it was a no-brainer to ditch the foam).

First I hacked the shape using a pair of scissors and then painted the whole thing with CeramCoat Dark Brown. I had gotten a bad bottle which I finally abandoned all attempts at using, but had yet to throw away, and figured this was as good a use as any. It pretty much kicked the bottle.

Painting foam < > Easy.

I used a large brush, itself made of foam, to "push" the paint into the furniture foam.


I then dry brushed with another unused color  in my pile, Americana Cocoa. I think i bought it as a potential color for my WWII Japanese, but ended up using Folk Art's Rusty Pipe instead. In any case, I found I couldn't actually dry brush the foam and instead painted it on where I wanted it.

Since the foam absorbs paint, there was no worry it'd go on too heavily.


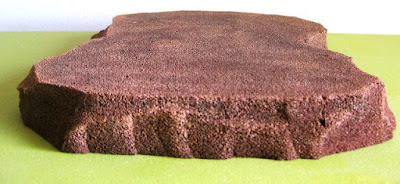
What appears to be coarse texture, by the way, is the foam itself. Which you can see better here:


Of course, a brown step-hill looks kind of like a mesa of some sort. I couldn't decide how I wanted to handle the top - painting it the color of my game board seemed logical, except, the table is decidedly "old school" in color and the hill leans a bit more towards the "model train" approach ("leans", not "is").

I dug out some felt, traced the top of the hill, trimmed it up a bit and voila!


*EDIT: The felt is not permanently affixed.  Thus, I can use the hill in multiple environments.

Here's some troops up on the hill:


It's unlikely this hill would see use in GNW-era battles but you never know.
I am rather pleased with the result, although the hill cover, for when I want it to represent a grassy hill, might better work if I simply painted a piece of felt with the same paint as my tabletop.

My favorite part is that it can be squashed to no ill effect. 

I can fold, bend, twist and otherwise contort the hill without fear of damage, meaning that storage of several foam hills in a space smaller than required for the same number of rigid hills is a good possibility.

It's also available in 3" and 4" thicknesses, which would work quite well with my 1/32 WWII games.

That said, for my horse and musket games, I'd really like the hills to have a clean cut edge - the rocky look is fine for WWII / Sci-Fi / Colonial but not what I am aiming for with my GNW project. I intend to pick up some more foam to see if using a knife gives the desired look.

Thursday, April 11, 2013

More Gunstorm!

Spacejacker clarified my rule question in the comments to my last post, so I wanted to play Gunstorm again. Plus, I wanted to start using the Stunts rules.

I grabbed a copy of In the Emperor's Name (ItEN) Campaign System and rolled up a mission: "No Stone Unturned"

My objective: 
The player must move at least one team member into contact with each marked doorway of each of the six objective buildings and remain in stationary contact for a whole turn in order to search the structure.
At the end of each search, roll 1d6. On a roll of 5-6, a piece of evidence is found that grants a victory point. Each building can only be searched once. On a roll of 1-3, deploy that number of enemy models just out of sight behind the nearest terrain piece or building to the building just searched. They will commence attacking in their next turn. Repeat until all buildings are searched.

There is a 10-turn limit on this scenario.

My force consisted of 5 figures, one had the Leader stunt and one had Medic (I'm slowly dipping my toe into the Stunt waters!). The enemy had 6 figures, no stunts.

Setup

My Intrepid Warriors

The Team moves out


Since there were no enemy deployed at the setup per the scenario, I drew phases as usual but ignored enemy results. The possibility existed each turn that I would draw Fortune before I drew Player Moves. If I drew Fortune, I still rolled to see who won the phase. If I lost, then my squad wouldn't move at all. In a turn-limit game that makes a big difference!

On turn 3 my force finishes searching the first building:


Which results in the first enemy on the table in Turn 4 (Enemy Shoots, Place on Table):

and they advance -Enemy Move (the scenario said "They will commence attacking in their next turn", which I took to mean they could still move):


and they win the Fortune phase and move again:


Turn 5, Player Move, I finish searching a 2nd building and a new enemy soldier appears on the board. Recognizing that I was half-way through my allotted turns, I opt to tap my Leader stunt.


I draw Fortune next and automatically win thanks to the Stunt. I choose Player Move to move into contact with another building on the left

Turn 6, while the 3rd and 4th buildings are being searched, the enemy moves up on the right and a brutal melee strikes up and lasts into Turn 7:


A shoot out on Turn 8 (Exchange Fire):


My leader is hit and fails his Guts Save. I pull a Wound marker! Phew!

He shoots one of the enemy and they aren't so lucky on their draw:


Meanwhile, on the left, my squad member is gunned down. There goes my Medic:

I draw Player Shoots to start turn 9 and my remaining squad member on the left fires at the enemy MG, and misses. Then I draw Exchange Fire:


Her number was up. 

Next, I pull Player Move. 

My squad leader, who had been freed up thanks to the death of a enemy bleeder, searches another building. I draw Fortune and finally win which allows me to un-tap my Leader stunt.

Turn 10, Player Moves: I tap my stunt but continue searching the building. 

Fortune is drawn next and I automatically win. My search of the building is complete. I roll and get a victory point. Finally! 

Unfortunately, it was too little, too late. I was out of turns, my entire squad was gone save the Leader and the enemy had figures on the board.

Still, in an ItEN campaign, that one point would be useful for recruiting my next squad. 

And, of course, now I have an itch to play an ItEN campaign with Gunstorm!

Tuesday, April 9, 2013

Playing Gunstorm Sci-Fi Skirmish and a Review

If you haven't heard/already seen it, Spacejacker has put up a set of solo small scale skirmish rules called Gunstorm, over on Tiny Solitary Soldiers. I believe they are technically still in Beta, but they are certainly playable.

It's been awhile since I broke out my 15mm sci-fi minis. This was the excuse I was waiting for.

For the first game, I sent a four-figure squad of Control Battalion against a 5 figure squad from the Resistance in a Extraction Scenario: both sides had the objective to get Master Shake off their side of the table.

The Control Battalion had fewer members because they had better armor. Both sides were led by a figure with a rating of Veteran, the rest were Regular. I did not use Stunts.


 The Setup

Between the number of times I drew Fortune, which were won by Control, and Move Enemy, Control moved unimpeded to within a move of Master Shake's HQ:


While my squad stood around scratching their butts:

"Hey, any of you catch the game last night?"
Then the momentum took a turn for the better:

We got there first!

Victory is mine!

Or not:


And it went down hill from there.

The pink stones are bleeders.
The last pic I took.
In the end, Control had Master Shake, and my squad was wiped out - mostly due to bleed outs.

I enjoyed the game enough that I decided to play a quick game today on a break (hence the less than evocative setup).

1 giant rampaging robot vs one squad

The squad started the game disembarked from their Labtec AFV. The robot is visible in the distance.


The phases went in my favor this time and we got up close fast before it had a chance to use its cannon:

I took a gamble upon winning a Fortune phase and moved out to get a combined shot at the robot (it had an 8+ armor rating and there was no way I would hit it without combining.) and crossed my fingers I wouldn't pull the Enemy Shoots phase next.

As luck would have it, I drew the Player Shoots phase and hit!

The robot rolled his Guts Save. He needed a 2 or higher:


Yeah! Take that Warmachine! I then drew the wound chip and drew a clear, which functions as the black wound markers since I don't have enough black stones, i.e. Out!


All in all a fun little system. I think the hardest part for me was figuring out what to use for phase chips and wound markers.

As I said, I think technically this is a Beta. There are some editing issues as of yet - primarily I couldn't find the base movement rate in v1.1 but I had downloaded v1.0 which showed it as 4", so that's what I used.

Also, there's no SMG on the ranged weapons table - not that it mattered in my games, and it's easy to extrapolate. Similarly, there are no vehicle rules, but again,extrapolating them shouldn't be difficult.

One rule I wasn't clear on was whether a model had to test for bleeding out if their side won the Fortune phase. The rules say: "Additionally, at the start of any of it's [sic] side's Phases, a model with Bleeder counters must make an unmodified Guts save for each counter."

 As I see it, neither the Fortune phase nor the Exchange Fire phase belong to either side, but that may not be the intent.

Much like FUBAR or USE ME, you can probably port these to just about any setting/genre.

The solo enemy control seems to work given the types of scenarios this is designed for: small numbers of figures with specific objectives engaged in gun fights.

In any case, they're free, so you can't beat the price. Download them and have a look if you haven't already!