Showing posts with label pacific theater. Show all posts

Friday, June 6, 2014

Nuts! Final Version Arrived! (Plus some other stuff that arrived not too long ago)

I went out to the mailbox today and to my surprise, my printed copy of the Nuts! Final Version rulebook was there.

Since I've ordered and received several sets of rules in the last month or so, I thought I'd do a group shot:


The Pacific was a find at the library book sale two weeks ago. It's quite a tome compared to my usual reading, so it might be a while before I can muster the fortitude to confront it. I also just finished No Bended Knee: the Battle for Guadalcanal, so I could use a break from the PTO for now.

The WWI rules were inspired by my reading of The Guns of August (a book I thoroughly enjoyed). Until I read The Guns of August I had only a barebones grasp of WWI. I'm not saying I'm an expert now, but I know more than I did and that's a start. And I find I want to read more about it. 

So, yeah, I fear a new wargaming period in my future.

Monday, June 2, 2014

Featherstone's Nuts! Trial by Fire.

Although I haven't been posting them, I've played several wargames of late, including games of World War Risus, Tactical Combat and Featherstone's Nuts! Most of the games were set in the Pacific Theater.

The reason behind the lack of posts has been the appalling pictorial documentation; my phone's camera isn't so great for close up photos of 1/72 figures. I shake the camera and I have no good way of stabilizing it, so pictures tend to be a bit uninteresting or worse, blurry.

Still, I enjoy having written and illustrated records of my gaming activities, and I decided to make some simple map-type illustrations for the latest encounter. I forgot how much I love arrows that show movement. Strange but true!

I generated the scenario with THW's War Against Japan.  PEFs and Japanese forces were all controlled using that same title.

I used Featherstone's Nuts! for the game itself, with the morale method from Featherstone's War Games added, and I changed the save results, such that, a figure that received 1 hit, ducked on a save, with 2 simultaneous hits and saves, moved 1 move away from enemy and ducked, and with 3 simultaneous hits and saves, moved 1 move away from enemy and hunkered down, requiring a friendly figure to make contact to rally.

Mission: Advance
My Force (USMC) : 1 platoon of 3 squads (I used 8 figure squads), plus platoon HQ (4 figs)

  • 1st Squad- NCO- Rep 5, Jr NCO - Rep 4, Riflemen - Rep 4
  • 2nd Squad- NCO- Rep 5, Jr NCO - Rep 4, Riflemen - Rep 5
  • 3rs Squad- NCO- Rep 5, Jr NCO - Rep 3, Riflemen - Rep 3
  • HQ - NCO - Rep 5, Jr NCO - Rep 4, Riflemen - Rep 3

My Objective: Reveal and eliminate all PEF encounters, and majority of Possible Contact markers, while sustaining no more than 1/3 casualties.

The map was generated using the terrain generator from War Against Japan.

I planned to use 1st and 2nd squad to identify and engage any PEFs or PCs, and use 3rd squad to act as reserves. HQ would only get involved under dire circumstances.
Initial dispositions and movement. 
1st Squad encountered a small band of Japanese infantry and was able to make good use of its BAR and SMGs. 2nd Squad did not have such luck - they encountered a full squad of Japanese, including an LMG team. HQ ordered 3rd squad to move up to assist.
Contact!
With 50% casualties, 2nd squad fell back. 3rd squad was shot up by the LMG as well, and forced to fall back. 1st Squad moved up to engage the Japanese force.
Things go South
1st squad engages the Japanese and manages to reduce their numbers significantly. Meanwhile, 2nd and 3rd squad combine into a single unit and advance on the Japanese.
2nd attempt.
The effort is in vain as they arrive on the scene only to take reactive fire from the Japanese squad - the loss of just 1 marine puts me over my limit for the mission. No matter, the PEF in the upper left split, and although I didn't get to reveal what, if anything they were, I placed them on the map to show that the odds were stacked against my success.

The Japanese were more committed than we were.

My platoon fell back to nurse their wounds.

***
The morale rules never came into play, as I chose to have my squads fall back - preservation was part of my mission objective after all. I did like the new rules for saves, as it kept units together except under extenuating circumstances.

Monday, March 31, 2014

Rising Sun: Operation Watchtower: The Brush Patrol

Last night, I decided to play the 2nd scenario in Rising Sun: Operation Watchtower from Britton Publishers using World War Risus.


Historical Background

While the first scenario was the ill-fated Goettge patrol, this one was a lot less grim:
 "To verify the strength of the Japanese in the region, another patrol is sent out on 19 August. This patrol is led by Captain Charles C. Brush, and although its primary mission is reconnaissance, it has sufficient combat power (64 Marines) to take care of business. As it makes its way toward Koli Point, it stumbles upon a large party of Japanese laying communications wire."
Set up

In game terms, 2 weak platoons of 2 sections of US Marines each are moving single file down a dirt path, and come across a 2 section platoon of Japanese. 

To simulate the single-file requirement, i decided that the 1st US platoon would start on the table but the 2nd could only move on once the first had left them enough room. This would entail using some of 1st platoon's HQ for its own actions, something I've had do to very infrequently in previous games of World War Risus.

There's a moment when the Japanese don't realize that the approaching soldiers are American before the fire fight begins. In game terms, I decided I would roll a Japanese unit's Combat Effectiveness, and on any success they would id the Americans and could attack the following turn.

The USMC objective is to eliminate the Japanese patrol before it exits the board. The Japanese goal is to get at least one unit off the table, regardless of condition. For MicroMelee, the game is limited to 4 turns. Having no idea what that equates to in World War Risus, I opted for 8 turns.

Since the whole thing takes place in thick jungle save for a winding dirt path (it's really hard to do a winding path with 2' x 3" strips of balsa) I just opted to leave the trees off the table entirely. 

This would prove to be a wise decision, as documented by the photograph below:

Pumpkin feigning surprise that I'm taking her picture.
Each base represents 1 section, while each lone figure represents a platoon HQ.

I gave all units +2 dice when receiving fire as if they were in hard cover. 

The Game

The Japanese won the initiative and the lead section identified the Americans right away, and so they could attack/react on the 2nd turn.

I was able to advance my 1st platoon up and out of the way on turn 1, except the HQ was blocking the 2nd platoon when the turn was over. 2nd platoon wouldn't be on the table until turn 3.

By then, the Japanese had one unit nearly off of the table, and only poor activation rolls kept them from exiting for a few more turns.

Shooting was largely ineffective due to the thick vegetation. 

Scoring any damage was neigh impossible, but I also tested my new modification for requiring a morale check any time a shooting unit scores a success, even if the target scores more successes.the morale check came into play. Unfortunately against my own Marines - one section failed their morale check, rolling 0 dice. They lost a morale die, were pushed back and pinned. 

When I finally scored a hit on one of the Japanese sections, I thought I might be able to stop them, but it wasn't to be. Every time a Japanese unit took a morale test they passed by 2 dice or more! 

The game lasted 6 turns before the first Japanese unit made it off table. 

Thoughts 

I really like World War Risus - as a solo player, it provides plenty of monkey wrenches to inhibit bias. It also provides some interesting decisions when it comes to allocating successes. Most of all, I can actually remember the rules since I wrote them.

Pumpkin expresses her dissatisfaction with the Marine performance by beating the officers with a tape measure.


Thursday, January 23, 2014

Rising Sun: Operation Watchtower: The Goettge Patrol

Last night, I played the first scenario from Britton Publishers' "Rising Sun: Operation Watchtower", The Goettge Patrol.

***** Historical Background *****

The historical action took place on August 12, 1942. A small patrol consisting of Lt. Col. Frank Goettge, some 24 marines and a surgeon set out to land west of Matanikau where, according to a Japanese prisoner, there were soldiers in dire straights and willing to surrender. Originally intended as a combat patrol, Goettge had changed the mission to a humanitarian one - and this change caused excessive delay; the patrol did not depart until night had fallen.

Things went to Hell, thereafter. 

The Marines landed at the wrong spot. Their amtrac which had gotten stuck on a sandbar, had, according to some sources, alerted the Japanese to their presence. 

http://guadalcanal.homestead.com/
When Goettge and 2 marines made a reconnaissance patrol down a path into the jungle, they encountered Japanese soldiers, Goettge was shot and killed. 

The two Marines managed to escape back to the beach to join the main body of the patrol which would spend the rest of the moonless night being picked off one by one by the Japanese. 

http://guadalcanal.homestead.com/
Three men survived - two who had tried to reach the American lines to bring reinforcements (it was too late to save the patrol), and one who retreated into ocean to swim (4 miles!) back to the American lines, when he was the last man left.


***** The Set Up *****

The Britton Publishers scenario begins with the 2 squads of marines and a platoon HQ on the beach and a company of Japanese in the jungle making their way towards the marine position. The Japanese have 4 turns to eliminate the marines.

One key point, 4 turns is in terms of Britton's MicroMelee game for company level actions, which allows units 1-6 actions per "phase." Having no idea what this means, I decided on a 12 turn limit for David Newport's Tactical Combat WWII rules, which are my preferred company-level rules.

Tactical Combat, like, from what I have gathered, MicroMelee, uses 1 base per squad. However, it seems to me that, if you have the figures for it, you could play this 1:1 with Nuts! or Disposable Heroes or any other 1:1 set of rules. 

Britton provides a handy map of the table, which I duplicated to the best of my ability - although I reduced the table size to 3' x approximately 2' 33"  (the water is craft foam sheets that are 9" x 12").

I deployed my Marines in the center of the beach near the water's edge per the historical situation and then placed the Japanese by platoon, using a d6 1-2 = left, 3-4 = center, 5-6 = right. I placed the mortar squad with the company HQ in the same way.

Rather surprisingly, I ended up with the Japanese in a line from end to end - which almost never happens when I distribute forces by die roll.


MicroMelee has some sort of quality rating for each squad, so I translated that into Tactical Combat WWII terms.

The rifle squads range from TQR2-4 in MicroMelee, so, I interpreted that as Green to Elite in Tactical Combat WWII and then rolled a d6: 1-2 Green, 3-4 Average, 5-6 = Elite.

  • Platoon A (right): 1st Squad: Elite, 2nd Squad: Average, 3rd Squad: Average
  • Platoon B (center): 1st Squad : Green, 2nd Squad: Elite, 3rd Squad: Average
  • Platoon C (left): 1st Squad: Average, 2nd Squad Elite, 3rd Squad: Green
  • The mortar squad is Green.

The USMC squads are both Average.

The marines would start with fox holes dug, which would give them soft cover and force a +1 on the Japanese attack rolls  (in Tactical Combat WWII, the higher the number the worse the result when attacking).

Because the scenario is set at night, I decided that long range fire was at +2, normal to long range was at +1, and within one move was at +/- 0.

The marines couldn't see into the jungle and thus I wouldn't allow them to fire at the Japanese until the Japanese had moved onto the beach (if they did).

To control the Japanese, I set up the following:
  • If they are out of range or no line of site, move up to range/LOS.
  • At t long range, roll 1d6:
    • 1-2 Fire
    • 3-4 Light Mortars fire, all others advance 1 move
    • 5-6 Advance 1 move
  • In normal range but more than 1 move, roll 1d6:
    • 1-2 Fire
    • 3-4 Light Mortars fire, all others advance 1 move
    • 5-6 Advance if Marines in cover, else Fire
  • Within 1 move, roll 1d6:
    • 1-2 Fire
    • 3-4 Advance to close combat if enemy is paralyzed or suppressed, otherwise Fire
    • 5-6 Advance to close combat
Although historically the Japanese didn't swarm the beach until the marines had been, to their knowledge, completely eliminated, that seemed really boring from a wargame perspective, hence why there's so much movement on those tables. 

Also, before the game started, I had decided that the Marines would sit tight and try to use their limited cover to increase their chance of survival, so I did not include an option where the Japanese would hold their action in order to use Opportunity Fire (only squads that do not activate/attempt activation can fire during their opponent's Movement phase).

The Japanese were the attackers, and so they would go first each turn. 


***** The Game *****

Turns 1 and 2 were simply advances made by the Japanese. The first move got them to the edge of cover, the 2nd allowed them to break out onto the beach. Marine rifle fire from the squad on the right managed to suppress a Japanese squad (B1, right most squad, center platoon).


Turn 3 saw more rifle fire exchanges.


In Turn 4 the first Japanese squads charged in for close combat. The marines made a strong showing and beat back the attacker with minor injury. Turn 5, they continued the close assaults, supported by fire from some of the squads.


Unable to hold out against the continued onslaught, by the end of Turn 5, the USMC squad on the left is driven back into the shallows of the water.

Still, they fought on despite having 2 hits (3 eliminates the stand), and in Turn 6, they took out the 1st Japanese squad.


The Marine squad on the right, which started the turn in perfect health was completely destroyed by the close assaults.

On into Turn 7, the Marine squad defended against attack after attack - eliminating THREE Japanese squads before finally succumbing to the superior numbers.


***** Thoughts on the Battle *****

I made it past the half-way point, and took out 4 Japanese rifle squads and 1 Japanese platoon HQ, so I don't feel too badly about my performance here.

If I were to play this again, with the same distribution of Japanese platoons evenly across the table, I would hold my Marines until the Japanese had committed, and then sweep out to one or the other side, to flank them. 

The idea would be to buy time by distancing my squads from the bulk of the Japanese force and limit the number of enemy squads that could engage them. Continued motion, rather than staying in any one spot, might increase the chance of survival.

Close combat, with the fox hole defensive advantage, slight as it was, may have extended the life of the Marines. That advantage would be lost if I used the fight-move-fight method above. But, the right Marine squad had two hits and won 3 rounds of close combat in turn 7 before being eliminated, so I'm not convinced that cover advantage meant all that much.

I lucked out that the Japanese mortar stand was useless - I rolled 9s and 10s every time it attacked.

Had it struck home it would have been disastrous for the Marines. 

Before I remembered it was night, I had planned to use it to lay down smoke, to give the advancing infantry some cover, but that was of no advantage at night and even if it had been day, it would only provided limited cover as it was just one single mortar stand. A handful of stands might make a big difference however in a daylight battle.

Friday, January 10, 2014

BMC Japanese and USMC: Brief Review

Picture from Amazon
I received my BMC Iwo Jima set the other day. The figures are quite nice, and at under $10 for 26 figures (12 USMC, 14 Japanese, and not counting the flag raising diorama), it's a very good deal.

Unlike BMC's rather comical "D-Day" figures, the sculpts are nicely proportioned and well detailed - I have no problem putting them up against TSSD's offerings (which is high praise indeed!).

They are also a little taller than Airfix or Matchbox, and might even be a smidge taller than TSSD, although they fit very well with all of those. And, frankly, I'd rather have them a little tall, than looking like skinny 10-year old kids (CTS, I'm looking at you!)

The marines were all unique poses, but the Japanese had a few duplicates - not a complaint, just informational. A few of the marines have BARs, one has a flame thrower and one has a bazooka. The Japanese have what look like Type 89 light mortars and what I'm guessing are Type 99 MGs.

The diorama is nice, although the flag is a molded blank space with a sticker applied. I'm planning to try to replace it with something better.

In the meantime, I'm doing my best not to rush out and buy 2 more packs (at $8.88 as of 1/10/14 they're a steal!) since 1) I already have the Pacific theater well under way in 1/72 and 2)I've already spent my budget for January, February and part of March!

Saturday, August 17, 2013

WWII PTO : Defend Against a Raid

Watching Ken Burns's The War has been giving me the itch to play more wargames and I had some time Friday night, so I grabbed my old cloth, threw it over the table and then randomly generated the terrain using the rules from War Against Japan.

For the actual game I used Disposable Heroes & Coffin for Seven Brothers, but I've been thinking part of the problem with any platoon sized game at 1:1 is moving the figures can take up precious game time. 

The obvious answer was multi-figure bases. So I used some cheap DIY movement "trays" (craft foam glued to cereal box) with 2 figures to a base. 

Voila, 1/2 as much to move!

For my force, I decided to use the Early War Marines (as detailed in Red Sun, Red Death) - treating the game as taking place in '42.

The scenario I rolled was Defend Against a Raid and was generated using Platoon Forward. The Japanese were on the attack and my Marines were dug in and defending an observation post. Only 1 squad would be on the board with a 2nd squad available as reinforcements.

The Japanese were to capture a prisoner. Odd, I though, given the "no quarter given" nature of the Pacific, but, OK. 

Tactical decisions for the Japanese were handled by Platoon Forward's "All Knowing Odds Table" which is like a simpler version of Mythic GME using just 1d10 and no Chaos factor.

Since I use a card activation instead of the rules-as-written initiative for DHC7B, as suggested by Platoon Forward I added an event card (when drawn, roll a d6, 6=event, then roll on appropriate tables in Platoon Forward).

The setup:
My squad set up on the hill, per the scenario description. 

My BAR team is top most, sarge and the rifle team is in the foreground. 

The Japanese started out represented by four Type A blinds (infantry) and 1 Type B (support weapons). They would not be revealed until they shot,  even if they moved  into the open.


The Game:

There wasn't much (any) movement on my part, save for being forced to Fall Back and then advancing to the original position. 

During turn 1, four A blinds were revealed, two were nothing, one was an LMG team, and one was this:


an entire squad plus their platoon commander.

In Turn 2, the B blind turned out to be an HMG team and the Japanese began their attempted assault on my position.


[here the pictures stop. They were breaking my flow and I was really getting into the game]

The LMG and HMG did a number on my squad but we still managed to force the Japanese to fall back.

Multiple times I contemplated getting my squad off the table and conceding the game to the Japanese, especially since my reinforcements seemed to be AWOL.

But the dice gods decided to grant me some favor and, suddenly, I was cutting down the Japanese, nearly entirely eliminating that once imposing full squad. 

So each turn, I'd tell myself, "just one more and then we'll fall back if the reinforcements don't show."  I wanted my men to put up a good fight, but I didn't want to see them massacred. Even if this wasn't a campaign game, I didn't want to lead them total destruction.

But I got greedy. I wanted to win, not just escape.

Their HMG and LMG managed to eliminate Sarge and the rifle team and then, to my surprise, the LMG team decided to advance, with the HMG providing covering fire and pins.

Activation went their way for several turns in a row and the Japanese charged into close combat, at which point it was clear that the dice gods had decided to abandon me.

Outnumbered 4 to 3 (the bar team suffered a wound back in Turn 1), I thought I had a chance still. Especially when, after the Japanese finished their portion of the round of melee, I only suffered 1 loss. My attacks missed their mark entirely though, and on the Japanese 2nd attempt, they scored 3 wounds. 

I counted this as taking 3 prisoners. It took 9 turns, but they achieved their objective and won the game and I spent the rest of the evening replaying the game in my head.

I should have gotten those boys out of there. I should have learned the rules for artillery fire and taken advantage of the fact that the odds were high that i'd have arty support. 

But I was lazy, and then I got caught up in the thrill of combat, and those boys paid for it.

Saturday, July 6, 2013

A Second Chance for Disposable Heroes

I'm human. I make mistakes. 

In this case, it was writing off Disposable Heroes. Something kept gnawing at me to give it another go, this time for an actual game scenario, and with 1) card activation for each unit and 2) the use of the optional rule that any one '1' rolled to hit a unit can take out the officer or special weapon.

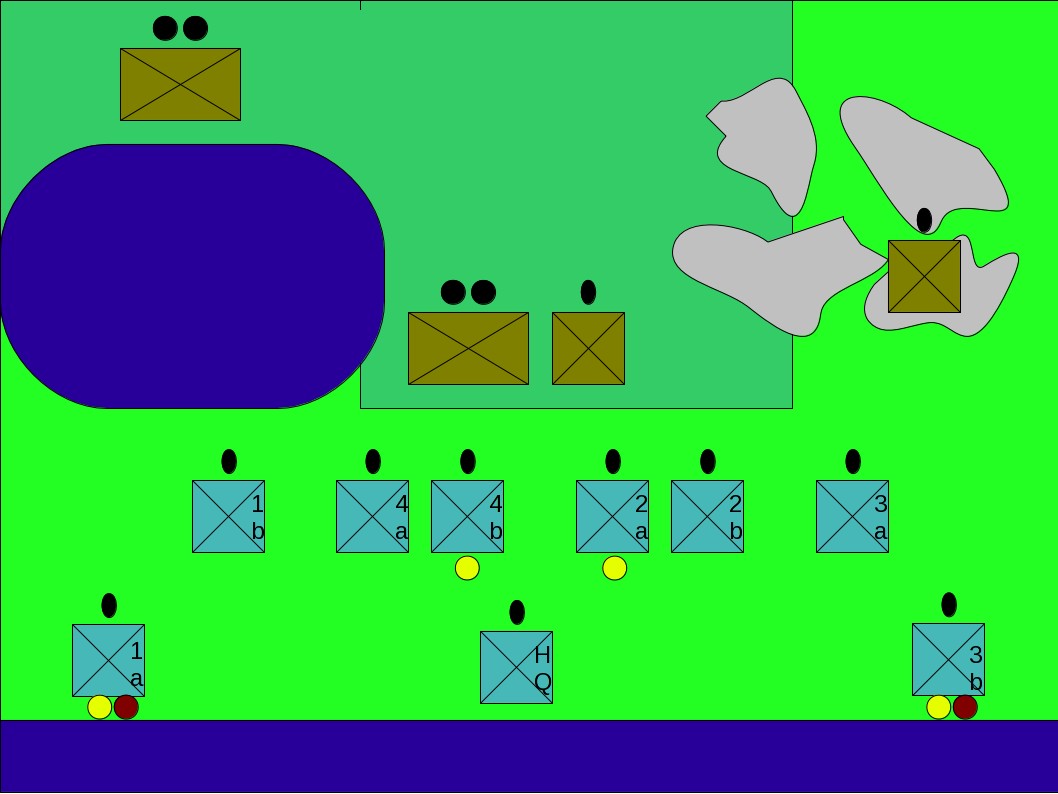
So yesterday, I set up the same scenario I used for THW's War Against Japan (beach assault). I modified the unit sizes to use those suggested in Red Sun, Red Death.

Here's the setup (I gave up on the photos this time around):

The Japanese are randomly determined using the War Against Japan guidelines. Both of the full squads, on the left, have LMGs.

My squads hit the beach but my Platoon HQ had no room to land.


Turn 1
My first order of business was to get my squads off the beach, with the end goal being to take out the Japanese defenses.

FYI, the yellow circles are first pins, red is the second pin a row.

 As you can see two of my units suffered two pins and heavy losses (the lower left was reduced to a man alone). But my HQ was able to land.


Turn 2
I managed to rally on the right and drive back the Japanese unit opposite.

Close combat erupted on my center right, and I destroyed a Japanese unit (a rifle team) while the LMG team of the same squad suffered a pin result.

Unfortunately all was not rosy; on my left, I lost a rifle team and my HQ was pinned with the loss of some riflemen.


Turn 3
The man alone on the left (the squad's sergeant), joined the Platoon HQ (which is why 1a looks like it disappeared).

I completely over ran the Japanese center and put the hurt on their LMG team of their remaining squad.


Turn 4
My marines continue to advance - not without loss, a rifle team from my 2nd squad was taken out. But the Japanese were dealt heavy losses and were unable to rally their LMG back into action.


Unfortunately, real life intervened and I had to call the game.

I have no doubt it would have been a marine victory, but a costly one at that.

Below you can see the figure counts remaining on the table:


Not very encouraging if this was a campaign!

I had a great time playing and it was the most engrossing attempt at playing this scenario. The rules are so easy to memorize that they disappear after awhile. 

Are they perfect? No, but they were a good bit of fun. 

So I withdraw my lack of enthusiasm for these rules. Time will tell if they become a regular staple (I realize recently that the only wargaming rule set I use with any consistency is G.A.S.L.I.G.H.T.) or if this was a fluke.

Tuesday, June 18, 2013

Save a Dead Tree: War Against Japan

I've been playing small test situations with Two Hour Wargames's (THW) Nuts! 2.0 and the War Against Japan (WAJ) supplement. The former I have used often enough, but the latter has languished in my book case until recently. 


Last night, I had a chance to set up and try an assault landing.

It was to be the start of a campaign, but due to a restless toddler who refused to sleep, my time to play was greatly truncated and the game didn't get very far before having to be torn down for the night.


I rolled Palm trees/Scrub for the dominant terrain type. This was somewhat unfortunate as it meant line of sight would extend unimpeded across the table (although it does provide cover and concealment:


The layout

I had a reenforced platoon consisting of :

  • Platoon HQ
  • Squad 1
  • Squad 2
  • Squad 3
  • Squad 4 (on loan for this mission)
  • Flamethrower (on loan) whom I attached to my HQ squad.


Enemy Activity Level was 3, my support level was 4.

I decided to send Squad 4 onto the beach first, and then diced for which section. The entered in section 1.


4th Squad takes to the beach.
To their front, upper left in the picture, you can see some coins I use for what are essentially random/hidden force markers. All of them resolved to nothing.

1st squad hit the beach in section 3 and found themselves opposite 4 markers, which resolved into two groups of infantry (13 figures total). The second group had an LMG. Fantastic.

And then passed 2d6 on their In Sight test. Great.


The results were horrific. The squad was decimated. 80% casualties and 20% wounded.

The rest of my force landed with little incident, thankfully.

Unfortunately, I ended up calling the game after 2 turns (that's how little time i had). 

Here's my right and part of my center - which also took fire, but was only forced to duck back (drop prone in this case):


On my left and the remainder of center things were going a better - the rest of 2 ,and all of 3 and 4 had made it up to the tree line, although Squads 3 and 4 were bunching up, since 4 had to work its way around the inlet.


I really don't feel capable of calling victory or defeat at this point. 

With an Enemy Activity Level of 3, it's a good bet a number of the remaining enemy markers would resolve to nothing. So, i plan to set it up again on Wednesday night and give it a go.

Thoughts about WAJ:

  • There are a lot of special rules for handling the Japanese and all of them feel "right" to me, as do the modified reaction tables for all forces in the Pacific.
  • The beach assault clearly has potential to be devastating to your force - which, to my understanding, is how it should be.
  • The tactics tables for the Japanese, as well as having a specified target preference order, helps take Japanese control further out of the solo player's hands.
  • I do have some questions, which is typical when playing a Two Hour Wargames title - mostly pertaining to LOS and resolution of those force markers.

Nuts! 2.0 is most often my choice for small 1:1 skirmishes (up to platoon) WWII gaming. Although I may use other  rules now and then, and even make my own, I always find myself trying to incorporate the THW reaction mechanisms into them. So my decision to use Nuts/WAJ should be viewed in that light.

Disposable Heroes covers the same sized conflict but feels very different, as I noted previously. I enjoyed them, but I wasn't overly excited by them.

 Nuts! feels like there's a lot happening, control is often wrested from you when things go south, and shooting is far bloodier, where DH feels a bit less frenetic (more like chess), gives you greater ability to coordinate complex plans (again, chess), and  shooting tends to pin, not kill. 

Both games suffer from status marker-itis, although Nuts! far more. I developed a tracking sheet for use with THW's CR3:FV but it is useless in a game with as many figures as this.

Of the two systems, Disposable Heroes seems to be far easier to learn and, I suspect,  teach someone else. But, once you grok the reaction mechanisms, THW games tend to be, in my opinion, a bit more exciting.

Tuesday, May 28, 2013

The Long Weekend

While I was out and about Saturday picking up some maintenance items for my car, I swung by the library for their Memorial Day weekend book sale and to drop off some books. I had only intended to buy books for Young Lord Shadowmoss, but as these things invariably go, I purchased yet another 4 items for my own reading pile:

  • Split Infinity by Piers Anthony
  • Prostho Plus by Piers Anthony (best setup ever: "Will a mild-mannered dentist from Earth be able to make it in the high-powered politics of galactic dentistry?")
  • Neuromancer by William Gibson 
  • No Bended Knee: The Battle for Guadalcanal: The memoir of Gen. Merrill B. Twining, USMC (Ret.)

As recompense for this tomfoolery, the universe deemed it necessary for me to slice my knee open on my way inside after mowing the lawn that afternoon. To explain exactly how this happened would be too complicated, but it involves a two car garage, a ladder, the garage door track, and thinking about what I was going to do, not what I was doing. The end result was 3 hours sitting around at urgent care in order to get 6 stitches.

In other, not unrelated news, in addition to watching war movies galore, I got a lot of painting done this weekend - my Soviet rifle squad is done, I'm nearly finished with the Semonovsky unit (a 12-figure battalion) for the Great Northern War and I started work on 4 more Soviets and 3 more Germans.

I also managed to squeeze in learning games of Iron Ivan's Disposable Heroes/Coffin for Seven Brothers, using my newly painted Soviets and Germans, and David Newport's "Tactical Combat" (available for free on the Lone Warrior site. Scroll down and look for 'Tactical Combat' WWII Rules), with my PTO collection.

Here's a blurry cell phone pic from the latter(turn 1 i think):


The stands represent sections, the individual figures are platoon HQ, and the individual in the center bottom is the company HQ. Ratio of figures to men is 1:3 in this case, but the figure count is irrelevant. You could got 1:1 or 1:5 (which i probably what I'll do in 1/32) or 1:10 (for battalion level games where each stand is a company).

I sent 1 company of USMC against 2 HMG teams and 2 rifle sections of Japanese in dug in positions guarding a cleared trail/road. The optional HMG rules - ignore long range penalty and roll 2 dice/choose the best result -make them pretty powerful. Although my marines won the day, we took around 30% casualties to clear those two positions.

As Lady and Younglord Shadowmoss are visiting her mother, tonight I will have ample time to paint and game, and plan to do just that, including working on the Semonvsky unit, and getting back into the Ever Expanding Dungeon (I haven't gone in there all month!).

Monday, November 12, 2012

USE ME WWII: Pacific Theater BatRep

Our Saturday night plans to see Lincoln were cancelled due to my prelude-to-bronchitis, so Lady Shadowmoss went to visit some friends and I stayed in, drank hot chocolate and played a wargame while wearing my pj's. Saturday nights are definitely not like they used to be!

Scenario: The Japanese are holding a ridge and the USMC want them off. There is a 10 turn limit.

OOB:

  • Japanese - 1 infantry section (10 figures) dug in, 1 MG crew (2 figs)  in pill box, 1 MG crew (2 figs) in bunker
  • USMC - 3 infantry sections (8 figures, 24 figs total, 2 of which had flame throwers, each section leader carried an SMG), 1 MG crew (2 figs)


Rules: USE ME WWII, all ranges modified x1.5 for 1/72 figures. Green markers mean "winged", any other color means "struck".

I placed the Japanese in defensive positions and randomly determined the entry points for the marines.

That big blue strip is actually a creek not a river!
The Japanese wait for their prey.

The Marines prepare for their advance.

The left advances safely in cover to engage the MG in the pillbox.

The right comes under fire from the HMG and the infantry squad on the hill.
With the pillbox MG crew eliminated, the Japanese right moves to get shot at the advancing Marines.

Marines storm the entrenched Japanese infantry under fire from the bunker MG.

The Marines' rifles make fast work of the Japanese squad.
They overrun the Japanese left with an eye towards silencing the MG in the bunker.
Meanwhile, on the Japanese right, Japanese charge to intercept and fire on the advancing USMC.
A gratuitous close-up.
After fierce hand to hand fighting on the USMC left and inside the bunker, the hill is cleared!

Total turns played: 9
Total playing time (including picture taking and re-learning the rules): 1.5 hours
Results: Japanese - 14 KIA, USMC - 6 KIA, 7 wounded (5 winged, 2 stunned)

Editor's note: I really need to do two things: 1) get a new piece of fabric for the table that photographs as green and not blue and 2)do something about all of those cat hairs stuck on the fabric and felt!