On our Thanksgiving holiday trip, we took Young Lord , Shadowmoss to see the Duke Energy Holiday Trains display at Union Terminal in Cincinnati, OH.
Union Terminal is a beautiful art deco building which still functions as a train station but also houses several museums.
I found quite a bit of interest inside, but two displays gave me some ideas for wargaming:
The above are trees and hills. I have no doubt that they appeal to almost no one as much as they appeal to me. The step hill is no different than millions of other step hills, but those trees!
How can I resist lumpy blobs of carved wood more toy-like, and durable, than my own craft foam trees? Not being much of a wood worker doesn't look like a barrier to creating them either.
What follows are two buildings that I really liked - they are basically the same, Power Station's #436 and #435.
Again, I love the toy look. These buildings, or something like them since these models go for $250-$300 on ebay, would work great on my table with 1/32 figures.
After doing some research, I found they are O scale, which, thanks to this scale and gauge page, I learned corresponds to 1/48 scale. Which got me thinking about commercially available O scale or 1/48 buildings. However, the difference in size for figures is 2.25 vs 1.5 inches. So, the doors and windows might be more under-scale than I'd like.
Unfortunately, I can't find any pics showing 1/32 figures with 1/48 or O-scale buildings!
Scratch building from foam core is probably far cheaper and a good bit more fun, and I can make the doors and windows to taste. Still, if anyone could point me to such a picture, it'd be appreciated.
The research I did, combined with the train displays also reaffirmed that the toy look is really what I'm after on my table in the larger scale for WWII.
Showing posts with label projects; terrain and scenery. Show all posts
Wednesday, December 4, 2013
Wednesday, November 14, 2012
Looking Ahead to 2013
There is still quite a bit of time to think on goals for 2013, but I think i have decided that in 2013, in addition to finishing painting my Great Northern War armies, I will focus on the renovation of my scenery and terrain.
It's no secret I don't put much stock in the whole "beautiful table" school of thought - I regularly game on gridded construction paper, cork tiles with sheets of felt glued on (and the seams rather visible) or even on just a printed sheet of paper. I sometimes put out my decent trees, but mostly I just throw down some old felt that I cut up long before I had any inkling about what I wanted from the hobby.
Now, I have played on beautiful "model railroad" type tables, so please spare me whatever songs you might sing in their defense. I appreciate their appearance and the effort to make them so, but they didn't increase my fun in any appreciable degree over my usual gaming. I am inspired, however, by simpler setups that are, none the less quite elegant to my eyes. So, while I don't aspire to model railroad scenes, I do want something different than I've got now. After all, my terrain bits are looking somewhat ragged, and cat hairs, after less than diligent maintenance, have woven themselves into my terrain cloth (such as it is), as well as just about every felt piece I use to indicate woods, rough terrain and water.
Never mind that my cloth photographs blue in all light ,but somehow looks more "forest green" in person or that I have never had hills that I have been remotely happy with.
So there you have it, one goal already pretty much set for 2013: Renovate my wargaming terrain and scenery.
It's no secret I don't put much stock in the whole "beautiful table" school of thought - I regularly game on gridded construction paper, cork tiles with sheets of felt glued on (and the seams rather visible) or even on just a printed sheet of paper. I sometimes put out my decent trees, but mostly I just throw down some old felt that I cut up long before I had any inkling about what I wanted from the hobby.
Now, I have played on beautiful "model railroad" type tables, so please spare me whatever songs you might sing in their defense. I appreciate their appearance and the effort to make them so, but they didn't increase my fun in any appreciable degree over my usual gaming. I am inspired, however, by simpler setups that are, none the less quite elegant to my eyes. So, while I don't aspire to model railroad scenes, I do want something different than I've got now. After all, my terrain bits are looking somewhat ragged, and cat hairs, after less than diligent maintenance, have woven themselves into my terrain cloth (such as it is), as well as just about every felt piece I use to indicate woods, rough terrain and water.
Never mind that my cloth photographs blue in all light ,but somehow looks more "forest green" in person or that I have never had hills that I have been remotely happy with.
So there you have it, one goal already pretty much set for 2013: Renovate my wargaming terrain and scenery.
Thursday, May 31, 2012
Palm Tree: Mach 2
A broad leaf palm tree experiment:
Materials:
Trunk:
![]() |
| You put the lime in the coconut |
- Printer paper - trunk
- Green construction paper - leaves
- 3/4" washer/coin/card, etc. for base
- White glue to affix to base
- Glue stick to close up trunk/affix stray leaves
- Craft paints
Trunk:
- Natural (Jo-Ann Fabrics brand)
- Dark Brown (Delta CeramCoat)
- Desert Sand (Delta CeramCoat)
- Hunter Green (Folk Art? Americana?)
- Clover (Folk Art)
- Green Tea (Delta CeramCoat)
Wednesday, May 30, 2012
Palm Tree Proof of Concept
Earlier today I found this site, which shows a simple, inexpensive way to make if not great palm trees, at least a lot of them for mass effect at almost no investment.
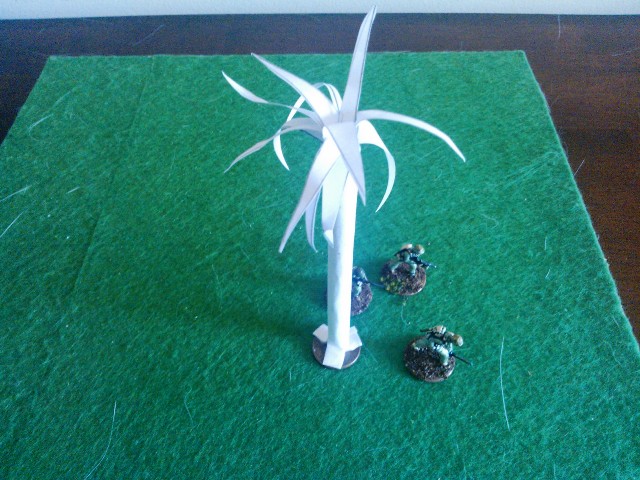
For the first tree I followed the directions to the letter and just used a sheet of printer paper:
I rather like the way it came out - but obviously a white palm tree is of use in a limited number of gaming scenarios - a frozen planet perhaps?Most certainly not in the Pacific.
For the first tree I followed the directions to the letter and just used a sheet of printer paper:
![]() |
| The rare Frost Palm. And a cat whisker. |
I found a palm tree flat online on the Oversoul site, but it's not quite to my tastes. I then tried to assemble one from green construction paper and a tan-ish piece of card stock. The latter looked too much like what it is.
So I got out the paint:
The left-most tree is the white tree painted and the middle tree is the card stock and construction paper with paint.
I like the first tree the best, and since I want a boat-load of palm trees for my Pacific Theater games, I think this is the way I'm going to go.
Some issues :
So I got out the paint:
The left-most tree is the white tree painted and the middle tree is the card stock and construction paper with paint.
I like the first tree the best, and since I want a boat-load of palm trees for my Pacific Theater games, I think this is the way I'm going to go.
Some issues :
- The fronds aren't quite the shape i want - cutting a different shape is easy enough
- The trunks get wider at the top - I attribute this to doing this rather hastily
- Painting the fronds after the tree is rolled is difficult at best - best to paint them even before you cut to prevent unwanted curling (you want some of course, just not as much as you'll get if you apply the paint after they've been cut). They stick together if you do them afterwards.
- Masking tape wrapped around the trunk may give a more bark-like appearance
Thursday, November 10, 2011
If a tree falls in a forest...
Last night, in those few spare minutes between the blueberry falling asleep and my own retiring to bed, I slapped together some examples of the Oversoul trees. One, assembled as intended, the other, an example of making a more 3d type of tree from two identical flats.
I snapped some comparison shots featuring a 15mm, 22mm and 25mm figure (not on his base yet).
Here's the first:
![]() |
| "Hey fellas, I think there's an even nicer Christmas tree over this way!" |
and the second:
![]() |
| Each man, with firm resolve, takes their post to defend their tree. |
I chose deciduous for the second because the Oversoul forest includes two identical trees which allowed me to experiment with cutting one in half from the bottom up, and one from the top down, each time, stopping in the middle.
Honestly, the effect of the latter isn't overwhelmingly better than the former, in my eyes. The only real benefit I can see it having is that, for a picture taken at the table-top level, you'll always have a tree image. Whereas, the first would not - unless I rotate the trees.
That's not exactly a problem from my point of view.
And from the top down, I find the X shape of the latter to be somewhat jarring, compared to the way the first almost disappears. At a normal viewing angle, I find the first far more pleasing aesthetically.
Both of these were printed at 79% and I think that shows. I'll probably go with 100% or larger even, and maybe extend the trunk length a bit. And I still want to try green card stock and either printing the outline of an evergreen on it, or free handing them with thick marker.
In any case, I've definitely eliminated the cake topper option with this test.
Subscribe to:
Posts (Atom)