Showing posts with label counters. Show all posts

Tuesday, April 1, 2014

Battle Over Britain: Minden Games - Solitaire Rule Modifications

Sgt. Hill, RAF, kept his eyes open for enemy fighters, the first waves signaling yet another attack. His effort was not wasted; soon, a cloud of Kraut warplanes appeared in the distance.

A few minutes later, chaos exploded around him as planes on both sides were punctured by lead pouring from machine guns,  and smoke and flame filled the once calm sky. 

It was no surprise when he spotted the ME109e coming in 9 o'clock high.

Calmly, Hill pulled up into a steep climb and watched the German fighter dive below him - Hill attempted to roll and dive after it, but the Spitfire wasn't agile enough to maneuver into position for a clean shot at the enemy. 


I know nothing of air to air combat, unless you count watching Top Gun, and it probably shows in the narrative above. However, I've played this game three times now, and each has been quite enjoyable despite this.

Battle over Britain is a small, fast-play (15 minutes or less), wargame from Minden Games - you get the rulebook, counter sheet, hit/damage table and a "dogfight display." The game is for 1-2 players and requires a d6 and a standard deck of 52 cards (and the two jokers to play solitaire).

The rules are fairly straight forward and took more time to read than the first two games I played! In addition to the core rules, there are a handful of optional rules,  a "scenario" generator, a campaign game, solitaire rules including a role-playing option.

In a two player game, each player is dealt a number of cards equal to their Speed rating. Hands are replenished after each round.

One of the keys to the game is having the Advantage (which generally represents altitude. Except when it doesn't). If you have it, you can shoot (maybe), but if not, you can't. The playing cards determine your position on the dogfight display, and the suits determine Advantage.

The plane with Advantage going into a turn plays their card second - clearly this gives them, wait for it, some advantage as they know their opponent's position on the display and can play a card to steal the advantage and get an attack, or at least thwart the enemy and prevent damage to themselves.

Now, as written, in solitaire play, the German plane simply uses the top card from the deck for their card. This works well enough, and I played the first two games this way, but it doesn't reflect any sense that they have an advantage. 

So, I decided to draw two cards, and choose the one that gives the best option. Yes, I could probably draw up to the max number of cards(defined by the speed attribute of the plane) and play the best, but so far, 2 seems to work.

 I rank the cards best to worst as follows:

  • Advantage with possible attack (best)
  • Advantage, no attack
  • Advantage, Head On (both sides fire)
    • Use this if has same or more damage points remaining than British, otherwise No Advantage or Disadvantage without a possible enemy attack is better.
  • No advantage for either side
  • Disadvantage, but no enemy attack possible
  • Disadvantage, enemy attack possible (worst)

The goal, is of course, to give the enemy the best position to win, and to make my life that much more difficult.

I found the decisions for my own cards interesting enough, but by no means taxing. In the last game, due to the cards I had been dealt, the choice was almost always between 5 similarly bad options. I should have used the "yank the stick" option, but forgot all about it (you can discard a number of cards, draw one and you have to play that one regardless). My strategy went from trying to win, to trying to run out the deck and reach a draw.

The solitaire rules also suggest that Germans always take a shot when possible, and that they don't run out of ammo.

All well and good, but I like to roll dice and draw cards and such, so I decided they sure as hell could run out of ammo and would make their decision to fire based on the following:

For a resolution number of:

4+ - always shoot because damage to the enemy is guaranteed.
3 - shoot 75% of the time
2 - shoot 50% of the time
1 - shoot 25% of the time

The Me109 had the advantage often in the third game, but couldn't capitalize on it - either not being able to shoot at all or only having a 25% chance (and then not firing) until turn 8, when he had a resolution of 1 and rolled 16%. 

The tinny sound of bullets perforating metal echoed in Sgt. Hill's ears as his Spitfire was riddled with holes by the German pilot. 

His die roll to hit was a 5, so he scored 2 points of damage against my Spitfire.

The plane still handled well, whatever damage had been done, Sgt. Hill could still fight. Not that he had any choice.

For two more turns the dogfight raged and then:

Feverishly, he worked the stick, trying to get the enemy into his site, but it was for naught. A flash of flame erupted from the engine, and the Spitfire exploded in a horrific fireball; so ended Sgt. Hill's brief career.

The first two games ended in less than 10 minutes, the last took 15 minutes, which is probably on the long end of things. 

The game has a very small footprint, 8.5" x 5.5", and is perfect for getting in some gaming on a lunch break without a big setup/tear down. 

I also have the Solitaire Module, which includes additional planes, and some expansion of the solo system, but I have yet to give them more than a cursory reading.

Thursday, January 2, 2014

Last Game of 2013: 19th C. Italians vs Ethiopians

On, well I don't know what night it was but it was before 2014, I managed to squeeze in a little game using some counters and a piece of scrap paper which I marked with a grid.

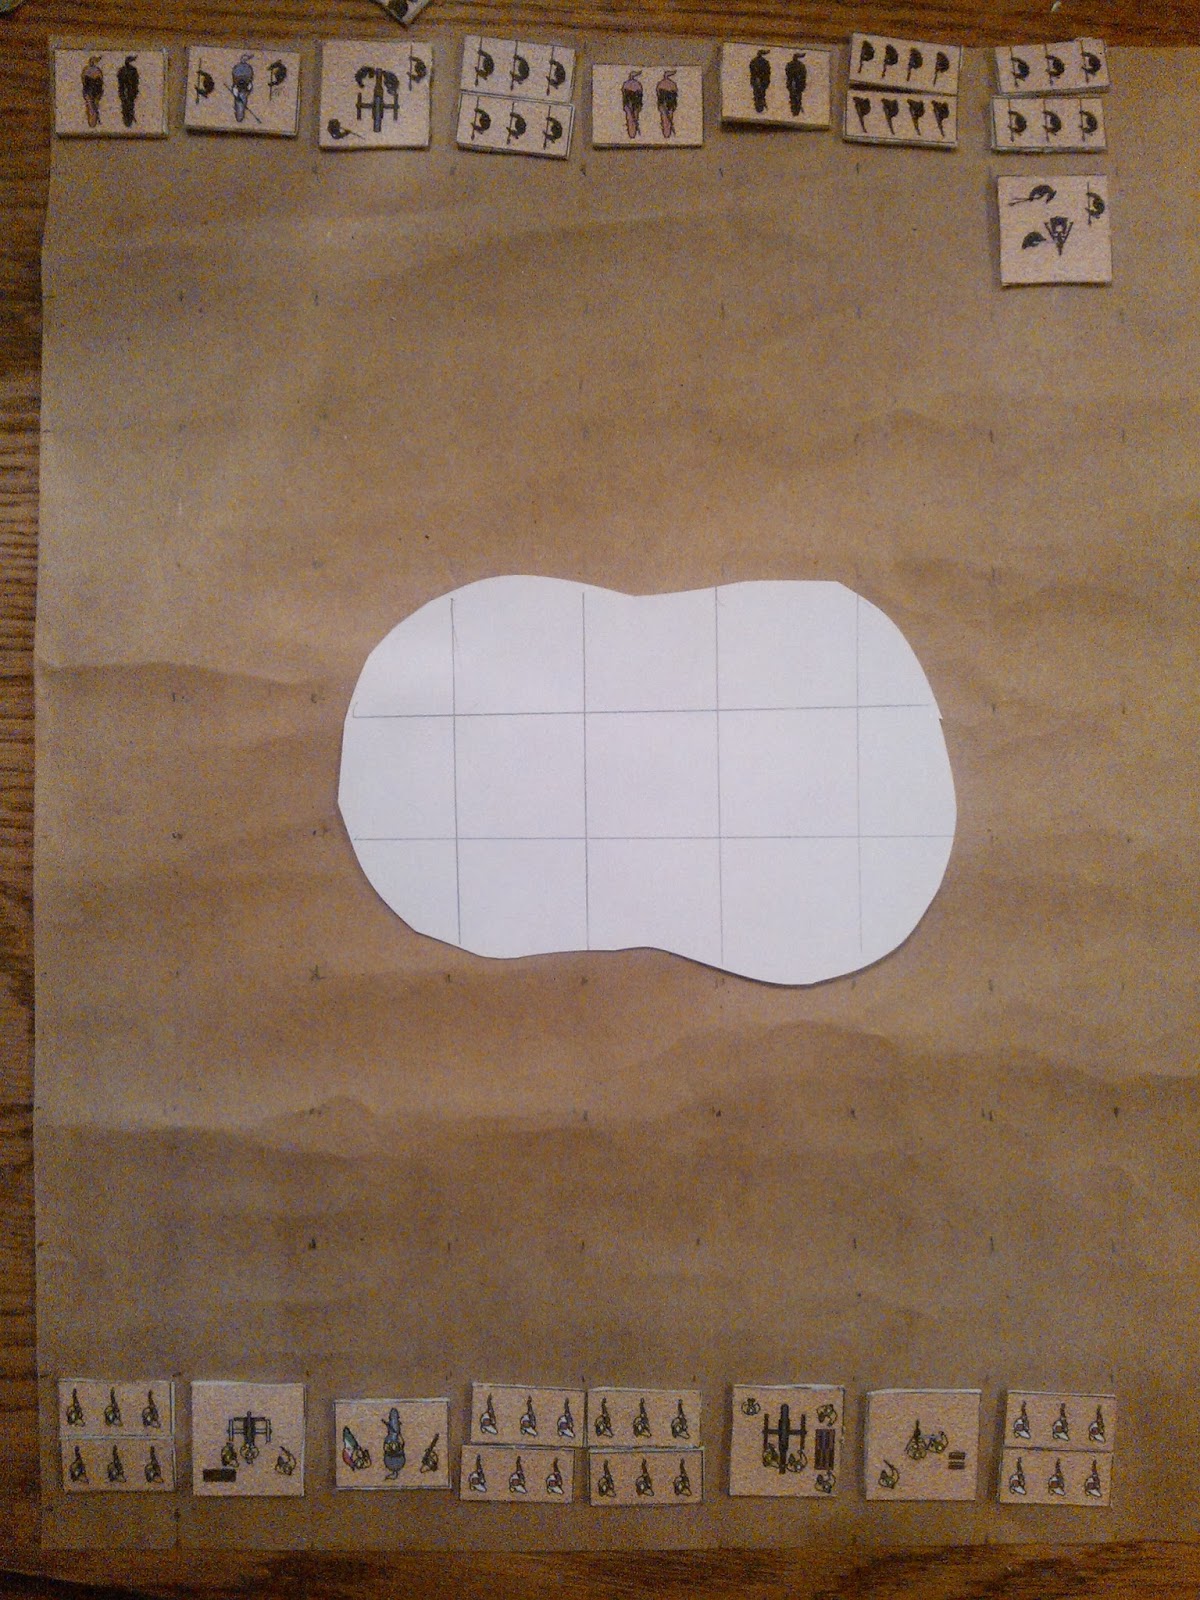
The idea was to bring some counters along on my Winter Holiday to visit my parents so that I could game in the evening when time allowed. Compared to miniatures, a baggie of counters takes up almost no space for a fairly varied force. In this case, counters are top-down Ethiopians and Italians, available from The Junior General.

The counters were mounted to the sticky side of a self-stick linoleum tile and then cut apart (not recommended. Craft foam is way easier to cut and results in an equally nice counter)


The rules were the well loved Portable Wargame, or that was the plan. As it turned out I conflated Memoir of Battle with the Portable Wargame, and ended up with something in between. The major error was that I allowed artillery to fire and move in the same turn. Ditto for the infantry.

Here is the setup:

 The Ethiopians and the Italians both want control of the hill in the middle of the field (the white scrap paper). They have 8 turns to do it. (That was somewhat arbitrary on my part). 

I used the tactical engine from Solo DBA for DBA Version 2.2 guide to handle the stance of both generals, and the tactical stance each turn for each side. I simply selected from the menu of likely options provided in that document.

Why not play one side as I usually do? Because, I'm Italian-American and have a bias for the Italians but I deplore the idea of colonialism, and as such, want the Ethiopians to win, per the historical result.

Two armies lay opposite and ready

Turn 1 - Artillery fire had no effect and both sides advanced towards the hill.

Turn 2 - The Italians manage to score a hit on Ethiopian cavalry but they absorb the blow, falling back temporarily. Both sides take a defensive stance and attempt to maneuver their units out of range of the other side's artillery.
End of Turn 2
 Turn 3 - The Ethiopian artillery strikes home, eliminating the leftmost Italian infantry unit but the Italians seize the initiative. The officer in charge orders the artillery up and center for better target selection. Meanwhile, the Ethiopians attempt to repair their line.

Turn 4 - Ethiopian artillery targets the Italian battery but over shoots, destroying the infantry unit behind the battery instead - a negative turned into a positive. The Italians manage to land shells among the Ethiopian battery forcing it to fall back. Here my mistake in letting artillery fire and then move is visible - essentially the artillery lost no ground as a result of the push back.


End Turn 4
Turn 5 - The artillery for both sides is ineffective, but the Italian machine gun opens up and destroys a unit of Ethiopian cavalry. The Ethiopians take a defensive stance and their leader orders them to take the terrain objective.

Turn 6 - The artillery shells again find their mark. This time, the Ethiopians targeted the Italian battery again and forced them to fall back. The Italians fired on the Ethiopian commander and fell short, the shells crashing among and destroying a unit of Ethiopian cavalry.

The Italians won the initiative 2 to 1, but still took on a defensive stance. In this case, a safe attack was made by the Italians on the 3rd dismounted cavalry unit, and they too were destroyed. 

Facing growing losses, the Ethiopian commander had the troops fall back off the hill and out of immediate danger.

Turn 7 - The artillery fails to strike home for either side, and both sides take a defensive posture as the casualties mount.


End Turn 7
Turn 8 - Although the Ethiopians successfully targeted and destroyed an Italian Askari unit, the Italians destroyed a unit of Ethiopian spear.

The Italian commander gets the jump on the Ethiopians (initiative rolls of 6 vs 1). He takes a defensive stance as he has the hill in his posession and simply needs to hold out.


Down with 50 % casualties, the Ethiopian commander faces a tough decision - attempt to knock the Italians back or retreat to fight another day?


Do they keep fighting? 1 yes and they will fight until the end, 2-3 Yes but check again next turn (not that there will be one), 4-5 No but they fall back in good order, 6 they rout from the field abandoning their artillery

I rolled a 5.

The commander opted to lead his troops off the field in good order to fight the Imperialists another day.  

End Turn 8
Despite my errors in rule following, it was a fun little battle; almost until the end, I had no idea which side was going to come out on top. 

The counters worked perfectly well for scratching the gaming itch and I hope to break out some WWII counters that I made (using the craft foam backing) sooner rather than later. 

Friday, August 10, 2012

Helvetica: Campaign Week 10

Colonel Duchamp, torn between what he knew to be a high risk attack and probable trap, and the fact that Heidegger would simply press his numerical advantage if he, Duchamp, waited too long, advanced his forces. 

In the tenth week of the conflict for Helvetica, the sides would once again meet at Fort Candide.

For this battle, as I mentioned in my previous post, I used a mashup of Bob Cordery's Memoir of Battle and G.A.S.L.I.G.H.T. In game terms, that means instead of the strength values in MoB, I used the remaining strength of the G.A.S.L.I.G.H.T. units, card activation, the start/sustain/save for vehicles, and, if it was necessary, saves for the unattached commanders.

Sauvignon-Blanc had to drive Riesling from the field or capture the two redoubts to win. Riesling either had to rout the enemy or hold out for 10 turns.

I ran neither side and left both to the whims of the Solo DBA rules for setup and tactical decisions. My involvement was to interpret the results of the tactical engine.

Both forces ended up grouped primarily in the center, with a unit on their left and one in reserve:


I decided reserves would arrive on a roll of 4-6 on a 1d6, after the first shots were fired. Which, as it turned out, meant the first turn as 2nd Battery opened up on Sauvignon-Blanc's 2e Compagnie. 

In spite of being on the defensive, Riesling was fairly aggressive, sending two units on its left early on, and Sauvignon-Blanc forces kept their distance.  

The walker returned to its temperamental self of the early weeks of the campaign and refused to start until turn 3. And stalled again on turn 4.


Duchamp managed to inspire his troops and 3e Goum did serious damage to 13th Kompanie (both are native lizard folk units). 1er Compagnie advanced to pepper the 13th as they fell back.


Although the walker finally managed to advance and get a shot off, it stalled again - this time within range of 1st Battery. Major Heidegger had attached himself to the battery and the bonus die came in handy as shell after shell pounded the walker. 13th K, nearly destroyed, fell back to the base line. In the center 1er C. and 7th K. exchange rifle fire :


By the end of turn 9, Duchamp had lost his walker and his unit of natives - a retreat was in order. Here's the table at the end of turn 10:

This turned out to be the last battle in the Battles for Helvetica - Duchamp used up all his reenforcements when Sauvignon-Blanc was forced back to Guillaume Le Roy. He's unable to replace the walker or replace 3e Goum which was reduced to 0 strength.

In a simple ceremony, Duchamp presented his sword to Heidegger and Helvetica now belongs to Riesling.

There are other islands in the Sans Serif chain, and war, which both sides had hoped to confine to the islands, seems likely to spread to the continent. And, of course, Riesling still has to handle the lizard folk who may decide to take advantage of a weakened imperial presence to rise up and revolt.

Exciting times!


Wednesday, August 8, 2012

Rethinking the Plastic and Lead Pile

I've been thinking about how necessary the miniatures are to my wargaming enjoyment. I recognize the blasphemous nature of my questioning but bear with me, please. 

To be sure, I got into this hobby because of toy soldiers - plastic "army men" to be precise. I wanted to do something with them (they were just sitting on my desk at work). But back then (lo those 7 years ago) the game was just an excuse to use the toys, but since then, slowly, the game seems to be ascending to dominance for me. I study the history (whereas before I knew almost none of it), read fictional works, watch movies and documentaries, research uniforms, etc. I've changed how I think about wargaming in general, so why haven't I examined this particular aspect of the experience yet?

Certainly, I've played games with paper stand-up figures and had a great deal of fun, so metal or plastic soldiers aren't necessary. But what if there were no figures at all but top down counters? Blocks? Counters of the kind found in the more traditional hex-and-counter games? Isn't a toy soldier just a token of some real or imagined "thing in the world" just as these are?

I have been inspired, for some time now, by the block armies of David Cook at A Wargaming Odyssey. Most recently, JF's solo Warring States Campaign played out on his refrigerator over on Solo Nexus fired up my imagination. Neither relies on proper miniatures to fight interesting and engaging battles. 

In fact, some of my most enjoyable games early on used homemade counters and torn construction paper for scenery to play Adventures in Jimland (I had no British, no Askari, no adventuring botanists, natives, porters, pygmies, etc. so I improvised) Somewhere along the way, I decided I couldn't play a game without having the miniatures on hand. That miniature wargaming was the only way I enjoyed wargaming. 

But what if that wasn't the case?

Last night, I decided to try it for myself.

Rather than waiting until next month to squeeze in my next Helvetica game - both to allow for the time to play a G.A.S.L.I.G.H.T. game and to assemble the artillery crews for Riesling - I opted instead use a mashup of Memoir of Battle and G.A.S.L.I.G.H.T. and to use some diy counters printed with the standard wargame symbols (which I believe are more properly NATO symbols) on a grid printed on an 8.5" x 11" piece of cardstock. 

Two armies lay opposite and ready.

The result was total immersion and fun - as much or more so than playing with figures. And for once, Major Heidegger didn't look suspiciously like Major Dietrich.

A close up later in the game. Colonel Duchamp, 2e Compagnie and 3e Goum.

The huge benefit I see is that I can quickly field any force of any size I want for a few minutes at the computer and then with a pair of scissors. For Riesling and Sauvignon-Blanc this means perhaps extending the campaign to the continent and maybe bringing in allies on both sides, native and imperial. With cavalry! (something I have not painted for any force in my possession.)

All of that on a very small playing surface might I add - making wargaming extremely portable.

Now, am I going to stop painting and appreciating miniatures? Hell no! 

But I have demonstrated to myself that they are not a key to my enjoyment of the game.

So, while I enjoy researching uniforms and painting, and I can not wait to view my gaming table when it's covered in 200 colorful Russians and Swedes or the marines landing on Tarrawa, it's a reminder that I don't need to acquire every mini I see that looks interesting, or build huge, expensive, armies, to have an enjoyable outing on the game table.

I know this is obvious, but sometimes it doesn't sink in until you prove it for yourself.